Fixing drywall tape on a ceiling might seem hard, but with the right tools and some patience, you can do it yourself. Over time, drywall tape can start to peel, bubble, or even crack, especially in humid areas like bathrooms. This guide will show you how to fix drywall tape on a ceiling so it looks smooth again.
Materials Needed:
Before starting your drywall tape repair, it’s essential to have all the necessary materials on hand. Here’s what you’ll need:
- Joint compound (drywall mud) – This is used to adhere the tape and create a smooth surface over the repair.
- Drywall tape comes in two kinds: paper and fiberglass mesh. Both types are good, but many people like paper tape because it makes smooth finishes.
- Utility knife – A sharp utility knife will help you remove the damaged tape and clean up the area.
- Putty knife (6-inch and 12-inch) – You’ll need a smaller knife to apply the joint compound and a larger one to feather the edges smoothly.
- Sandpaper (120-220 grit) – Fine-grit sandpaper will be used to smooth out the dried compound.
- Primer and paint (optional) – Once the repair is done, you’ll want to prime and paint the area to match the rest of the ceiling.
Steps to Repair Drywall Tape on a Ceiling:
Step 1: Inspect the Damage
Before diving into repairs, take a moment to carefully inspect the area where the drywall tape is peeling or bubbling. In some cases, the damage may be limited to just a small section of tape that’s become loose, while in others, the surrounding drywall could be affected too. Knowing how bad the damage is will help you decide how much work you need to do. You can figure out if you need to replace the tape or just fix a small part.
- Tip: If you see that the problem is bigger than just the tape, like if the drywall is damaged too, you may need to fix that area before putting the tape back on.
Step 2: Remove Loose Tape
Once you’ve assessed the damage, the next step is to remove any loose or damaged tape. Using a sharp utility knife, carefully cut away the peeling or bubbling section. Be gentle while doing this to avoid accidentally cutting or damaging the surrounding drywall.
- Tip: When cutting away the tape, try to remove only what’s necessary. Overcutting could result in a larger area to repair, which means more joint compound and sanding later on.
Step 3: Prepare the Surface
With the loose tape removed, it’s time to prepare the surface for the new tape. Use your utility knife or a putty knife to scrape away any remaining pieces of loose joint compound from the area. This ensures that the surface is clean, smooth, and ready for the new tape. Also, make sure to clean the area, removing dust, debris, and any drywall particles. A damp cloth can help ensure the area is dust-free before moving on to the next step.
- Tip: If there’s any damage to the drywall itself (like gouges or deep scratches), you’ll want to patch these before applying the new tape. Apply a thin layer of joint compound and let it dry before continuing.
Step 4: Apply New Drywall Tape
Now it’s time to apply the new drywall tape. Start by cutting a piece of drywall tape that’s long enough to cover the area you’re repairing. If you’re using paper tape, fold it slightly along the middle to create a crease, making it easier to apply smoothly to the ceiling.
- Apply a thin layer of joint compound – Use your 6-inch putty knife to apply a thin layer of joint compound to the area where the tape will go.
- Press the tape into the compound – Carefully press the drywall tape into the fresh compound. Use the putty knife to smooth out the tape, ensuring there are no air bubbles or wrinkles. If the tape starts to wrinkle, gently lift it up and reapply.
- Make the edges smooth – After putting the tape down, add a little more joint compound on top. Make the edges smooth so the tape looks like it belongs with the rest of the drywall. Use a 12-inch putty knife for a wider spread, creating a smoother finish.
- Tip: Take your time when smoothing the tape. If there are bubbles or wrinkles, they’ll be harder to fix later. Press firmly but carefully to ensure the tape adheres to the compound.
Step 5: Let the Joint Compound Dry
Now comes the waiting part. Allow the joint compound to dry completely, which usually takes around 24 hours. Some quick-setting compounds may dry faster, but it’s essential to follow the instructions on your product.
- Tip: Make sure the area has good air flow to help it dry faster. But don’t blow fans right on the compound, because this can make cracks or cause it to dry unevenly.
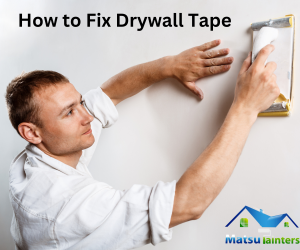
Step 6: Sand the Area
Once the compound has dried, it’s time to smooth things out. Grab your sandpaper or sanding sponge (120 to 220 grit works best) and lightly sand the area. Be careful not to sand too aggressively, as this can tear the tape or remove too much compound.
- Tip: A sanding sponge may be easier to control on the ceiling, especially if you’re working at an awkward angle. After sanding, run your hand over the surface to ensure it’s smooth and level.
Step 7: Apply Additional Coats (If Needed)
If the surface isn’t as smooth as you’d like or if the tape still feels visible, apply a second coat of joint compound. Feather the edges again with your 12-inch putty knife, blending it further into the surrounding drywall. Let this second coat dry, then sand it down once more.
- Tip: It’s better to apply multiple thin coats rather than one thick coat of joint compound. Thicker coats can take longer to dry and may result in bumps or uneven patches.
Step 8: Prime and Paint
The final step in repairing your ceiling is to prime and paint the repaired area. Start by applying a coat of primer to seal the joint compound. Once the primer is dry, you can paint the area to match the rest of the ceiling. If you don’t have the exact same paint color, try to repaint the entire ceiling section for a more even finish.
- Tip: Make sure the primer and paint you use are compatible with the joint compound for the best results.
Conclusion
- Safety First: When working on ceilings, especially high ones, always use a sturdy ladder or scaffolding to avoid accidents. Make sure your work area is well-lit and ventilated, particularly when using joint compound and paint.
- Moisture Problems: If the tape on your ceiling keeps falling off or you see bubbles a lot, there might be a problem with moisture. Leaks or excessive humidity can cause the tape to fail, so it’s worth checking for water damage or moisture problems before repairing.
By following these steps carefully, you’ll be able to fix the peeling drywall tape on your ceiling and restore the surface to look as good as new!
Frequently Asked Questions
Can I Fix a Hole in the Wall Myself?
Yes, fixing a hole in the wall is something you can definitely handle yourself with the right tools and techniques! Small holes, like those caused by nails or screws, can be patched easily using some spackling paste and a putty knife. Just fill the hole, smooth it over, and let it dry. For larger holes, you may need to apply a patch, tape it, and then cover it with joint compound. If you’re not comfortable with larger repairs, you may want to consider hiring a professional.
How to Patch a Large Hole in Drywall with Mesh?
Patching a large hole in drywall with mesh is a bit more involved but still manageable. First, you’ll need a self-adhesive mesh drywall patch that’s large enough to cover the hole. Start by placing the mesh over the hole, making sure it’s centered. Then, apply joint compound over the patch using a wide putty knife, feathering the edges to blend it with the surrounding wall. Let it dry completely, sand it smooth, and apply a second coat if needed. Once it’s fully dry and smooth, you can paint over the area.
How to Fill Drywall Anchor Holes?
Filling drywall anchor holes is quite simple. Start by removing the anchor if it’s still in the wall. You can either pull it out or push it through, depending on the type. Once the anchor is out, apply spackling paste or joint compound to the hole using a putty knife. Smooth it over and allow it to dry. After it’s dry, sand the area lightly to make it flush with the wall. Finally, prime and paint over the patch to match the rest of the wall.